Fusion Script and Macro Collection
I’ve noticed quite a few Google hits for Fusion on my blog, so I thought I’d write a short summary of various scripts and macros I have created over the years.
Note: Since Fusion was aquired by Blackmagic Design, vfxpedia has been turned off and thus many links no longer work. Besides that, Fusion 7 introduced a new LUA interpreter that requires changes to some scripts. If a script no longer works in Fusion 7.x or you need a Fuse or Macro that was hosted on vfxpedia, drop me a line or visit the forum at steakunderwater.com/wesuckless where I might have already posted an updated version.
Scripts
- A huge improvement to the Add Tool script.
- Exporting keyframe data to After Effects
- Importing keyframe data from Nuke
- Saver Checker Script that creates missing output directories and lists enabled savers (useful if there are a lot of them).
- Loader From Saver creates or updates a loader from a selected saver.
- 3-Point-ImagePlane, a script that automatically aligns 3D planes to vertices in a point cloud.
- Freeze Cam, a helper script for projections that duplicates a camera and removes its animation.
- Tool Color Labels to easily tag your flow.
- Invert Animation Curve, a script that swaps time and value of an animation spline.
- An improved version of Fusion’s “Change Paths” to do search&replace operations on your loaders and savers.
- An improved version of “Destabilize Transform” to connect trackers to almost anything that has a center, size and angle slider.
- An improved Python implementation of the Bake Animation script, that processes multiple properties at the same time.
- Un-Modify, a tool script to remove modifiers from a stack without killing the whole animation.
- A converter to use Syntheyes lens distortion values with Fusion’s LensDistort tool.
- A suite of scripts to exchange shots between Fusion and Syntheyes.
More scripts and script-related snippets can be found on Vfxpedia, by the way.
Macros
- A 3D Colorspace Keyer implementation.
- ExponentialGlow, a glow with a nice photorealistic falloff.
- Image Mixer to help with applying scanned grain from gray cards.
- Macros to apply Lustre(R) merry grades, Josh Pine’s log2lin math and Nuke-inspired TMI color balance.
- An implementation of Nuke’s Ramp tool for gradients.
- A Color Picker that can be placed on top of an image to serve as a persistent color readout which has since been improved by Gregory Chalenko.
- SoftClip, a macro to gently compress overbright values below 1.0.
- SigmoidalContrast creates an S-shaped contrast curve.
- SpillMerge, an advanced keying solution for smoke or reflections.
- “Toe”, a macro to gently raise an image’s black level (inspired by Nuke’s tool of the same name)
- “Turn” for rotating an image (including its canvas) in steps of 90 degrees.
Fuses
- Open-Source Plugins to create Lightning Bolts, Lens Flares or Lines
- GPU-accelerated Rolling Shutter correction based on motion vectors from eyeon’s Dimension plugin.
- A Smoothcam-inspired Fuse to automatically stabilize or smooth a shaky camera move.
- CubeToLatLong turns a cube map into (part of) an equirectangular panorama.
- SparseColor draws gradients or fills an image using multiple spots of color.
- A Nuke-like color correction Fuse whose contrast slider works well on linear images.
- A GPU-accelerated CornerPin, an improvement over Fusion’s native tool.
- A Switch Fuse as found in Shake or Nuke.
- A Fuse to manage auxiliary channels (like depth or vectors).
- A clone of Nuke’s Reformat tool to fit an image into another image format.
- A modifier for averaging two or four point positions (e.g. trackers)
- PositionHelper, a modifier to easily smooth a tracker path or change its reference frame.
- XfChroma, a transform tool that leaves a colorful trail.
All scripts and Fuses are open-source (mostly BSD-style) and commented extensively to serve as scripting tutorials 🙂 Feedback is always welcome.
A Better Corner Pin for Fusion
 Nowadays everything is about 3D matchmoving, but 2D corner pinning still has its uses. Unfortunately, Fusion’s corner pin tool is quite limited compared to the same tool in Nuke. For example, you’re only able to move the corners of the source image. If you need to define your distortion using different source coordinates, you’ll have to put a “perspective positioner” before the corner pin which degrades image quality in most cases. Moreover, you need to use all four corners. iPhone-like pinch&zoom effects, where you pin just two or three points can’t be done.
There’s an alternative tool which is part of the great Krokodove plugin set, but it’s outdated as well since it doesn’t support DoD and it lacks the fine-tuning offsets that the original Corner Pin has. They help you a lot on stereo shots where you want to offset all four corners from one eye to the other.
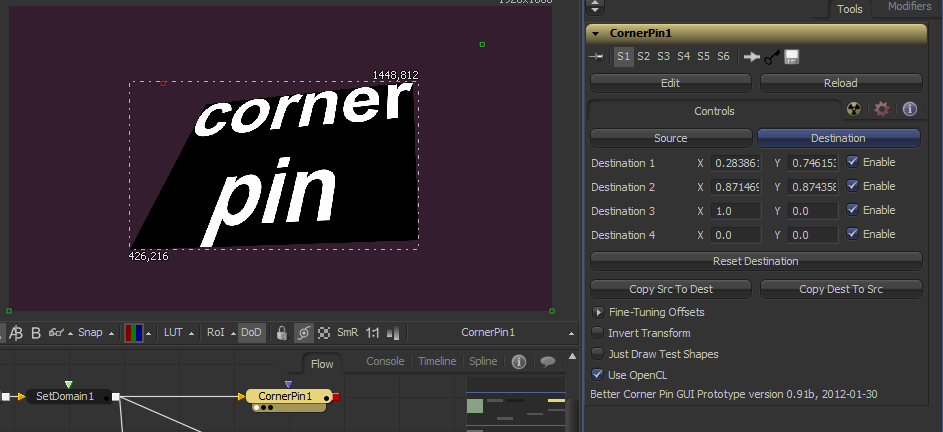
Long story short: I’ve researched some matrix math and turned what was meant as a GUI prototype into a fully OpenCL accelerated Fusion plugin (works without a GPU as well of course).
I’ve learned a lot about how to write Fuse plugins (proxy mode, DoD, OpenCL kernels) and had some helpful feedback on from other Fusion users. To give back to the community, the code is commented extensively and available under a BSD license.
Download BetterCornerPin_v1_6.Fuse or check out the manual at Vfxpedia. You need at least Fusion 6.31 due to continued improvements of the Fuse API.
Some features couldn’t be implemented in a Fuse: concatenation with other transform nodes or some more helpful overlays in the viewers. You’d need to write a C++ plugin.
Normals, Matrices and Euler Angles
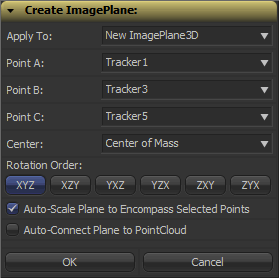 Fusion can import point clouds from a 3D camera track, but there’s no easy way to align an image plane to three points in space. If you want to place walls or floors for camera projection setups, this makes for a tedious task of tweaking angles and offsets. So, I’ve been dusting off my math skills, especially transformation matrices, to write a script that allows you to place an ImagePlane3D or Shape3D with just a few clicks.
It’s a tool script that goes into your Scripts:Tool folder. You need to select a PointCloud3D before running it. Unfortunately, there’s no way for the script to know which points of the point cloud you have already selected 🙁 You need to hover your mouse over the point cloud vertices after you have launched the script to read their names and select the desired points from a list. The script will, however, remember your choices so you can play around with various trackers quickly and you can choose to apply the transformation to existing planes instead of creating new ones. Here’s a video of the process:
Here’s a script to freeze cameras for projection setups easily.
In case you’re curious: these are the steps that are necessary to solve this problem. Maybe it’s useful to somebody solving the same problem.
- A plane is defined by three points, which we have, but Fusion needs a center offset and three Euler angles move an object in 3D space.
- The center can be chosen almost arbitrarily: any point that lies on the plane is fine. For my script, the user is able to choose between one of the three vertices or their average (which is the triangle’s center of mass). The rotation angles can be deducted from the plane’s normal vector.
- To get the normal vector, build two vectors between the plane’s three vertices and calculate the cross product. This will result in a vector that is perpendicular to the two vectors and thus perpendicular to the whole plane.
- This vector alone won’t give you the required rotation angles just yet. You need a rotation matrix first. According to this very helpful answer on stackoverflow, a rotation matrix is created by three linearly independent vectors. These are basically the three perpendicular axis vectors of a coordinate system that has been rotated. One of them is the normal vector (which is used as the rotated Z axis). The second one could be one of the vectors we used to calculate the normal vector. However, there’s an algorithm that can produce a better second vector, one that is aligned to the world’s XYZ axes as closely as possible. This is useful since the plane we’re creating is a 3D object with limited extends instead of an infinitely large plane.
- The third vector we need can again be calculated using the cross product between the normal vector and the result of the previous step.
- To decompose a rotation matrix into Euler angles, there’s a confusing amount of solutions on the web since there are several conventions: row vectors vs. column vectors, which axis is up and most importantly, what’s the desired rotation order (for example XYZ or ZXY?). Fusion uses row vectors and supports all 6 possible rotation orders, so we’ll go with that. The source code can be found in Matrix4.h of Fusion’s SDK. Moreover, this paper (“Computing Euler angles from a rotation matrix”) explains the process quite well.
TMI Color Temperature Correction
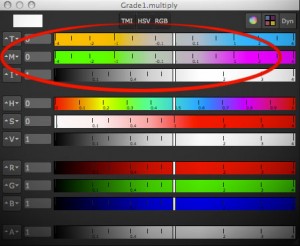 One of the things that I miss in Fusion whenever I have been using Nuke is a way to adjust colors using color temperature. Yes, there’s a white balance tool, but it’s a bit of a black box and it doesn’t have the kind of sliders known from Nuke (or even Photoshop’s RAW converter). I think Fusion’s tool is pretty accurate in terms of color science, but for eyeballing adjustments or creative tinting the other programs’ sliders are more useful.
Nuke provides the TMI system in its color picker so you can use it anywhere you see a color swatch. One parameter adjusts the color temperature by moving red and blue in different directions (you don’t have to specify a proper temperature like 5300K). The second parameter is a shift along the magenta/green axis.
Here’s a macro which allows you to tint an image using this system in Fusion. I don’t know if the formulas I’ve reverse-engineered are only used in Nuke or if there’s a standard for TMI (it’s kinda hard to find information about it). It goes without saying though that all of this is only valid in a linear color space. Reportedly it was also useful to cancel the effect of the ARRI Alexa’s white balance and CC Shift settings.
update August 2013:
I’m getting a bunch of Google hits for the TMI system, although I haven’t spelled out the formulas I’ve used for my macro. Here they are (as used by Nuke’s color picker)…
Color Temperature (T):
Red Gain = 1 – T/2, Blue Gain = 1 + T/2
Magenta/Green (M):
Red Gain = 1 + M/3, Green Gain = 1 – M*2/3, Blue Gain = 1 + M/3
Intensity (I):
RGB Gain = 1.0 + Intensity
Download the macro here or view the help page on vfxpedia.
VFX Breakdown Effect (Breakdown)
I was pointed to an effects reel for “Wrath of the Titans” by Method Studios (you need to watch it on YouTube due to the usual licensing issues):
The shots look cool, but what was more interesting is the way they did the breakdown of their CG elements. Look at the camera moves at 0:14 or 1:17.
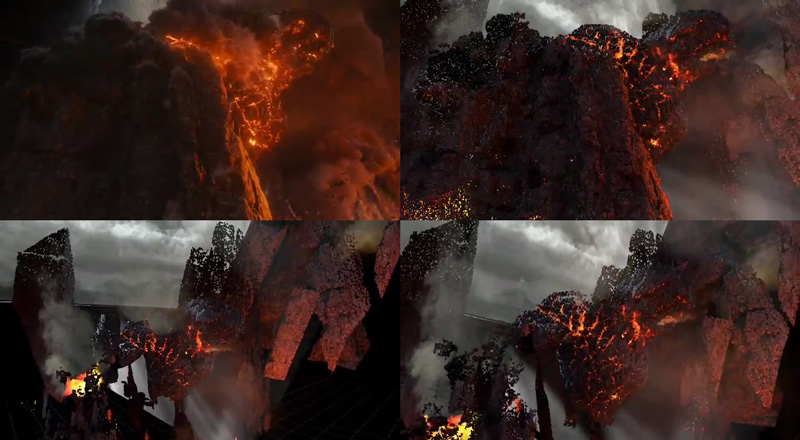
I’ve tried to dissect their technique using a Fusion comp and some random model I’ve downloaded from turbosquid (so don’t tell me it doesn’t look as cool as Kronos in the video above). The way I think this was done was by projecting the rendered passes back onto either real geometry or a recreation of the geometry using a world position pass. The latter is the only feasible solution for scenes with a high polygon count and can also be done as a particle cloud (see the “dissolving” rocks in the stills above).
Then, additional footage is brought in on image planes. Whether the footage was a 2D matte painting to begin with or a CG element doesn’t matter, for the breakdown it’s all treated like a 2D element. You can see this on the flat volumetric godrays.
To spice it up even more, they probably rendered additional passes especially for the breakdown (for example the wireframe pass) using the camera move designed for the breakdown shot. At this point you could also re-render your scene’s FX passes using the new camera move and treat the breakdown shot as if it was an original shot 🙂 Depends on how much work you wanna put into it.
Here’s a quick video that puts all the techniques together: particle cloud, projections, image planes and wireframe pass.
Mosaic Effect in Fusion
I’ve recorded another video tutorial for your viewing pleasure. It’s just a tiny effect, but the video shows that you can take even little tasks like this a bit further.
Correcting Rolling Shutter in Fusion
eyeon has recently released its Dimension optical flow and stereo disparity toolset. I didn’t have a chance to test the stereo part yet, but since you can now calculate nice and crisp motion vectors, I’ve written a Fuse that can correct rolling shutter artifacts. Here’s a quick demo video:
You can get real-time performance on your GPU using OpenCL and as usual I’ve licensed my source code BSD-style if you want to tinker with it.
I haven’t had enough footage from different cameras to test the plugin thoroughly (just my iPhone and a Canon 5D Mark II). I also haven’t tested any other motion vector generators except for Dimension. Maybe Twixtor works as well, we’ll see…
Updated 2012-10-09: supports the rolling shutter method used by Syntheyes (center scanline is fixed)
 Download the plugin here: RollingShutter_v1_6.Fuse or head over to Vfxpedia.
Photo credits for icon: CC-BY Nayu Kim

