TMI Color Temperature Correction
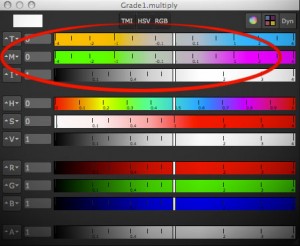 One of the things that I miss in Fusion whenever I have been using Nuke is a way to adjust colors using color temperature. Yes, there’s a white balance tool, but it’s a bit of a black box and it doesn’t have the kind of sliders known from Nuke (or even Photoshop’s RAW converter). I think Fusion’s tool is pretty accurate in terms of color science, but for eyeballing adjustments or creative tinting the other programs’ sliders are more useful.
Nuke provides the TMI system in its color picker so you can use it anywhere you see a color swatch. One parameter adjusts the color temperature by moving red and blue in different directions (you don’t have to specify a proper temperature like 5300K). The second parameter is a shift along the magenta/green axis.
Here’s a macro which allows you to tint an image using this system in Fusion. I don’t know if the formulas I’ve reverse-engineered are only used in Nuke or if there’s a standard for TMI (it’s kinda hard to find information about it). It goes without saying though that all of this is only valid in a linear color space. Reportedly it was also useful to cancel the effect of the ARRI Alexa’s white balance and CC Shift settings.
update August 2013:
I’m getting a bunch of Google hits for the TMI system, although I haven’t spelled out the formulas I’ve used for my macro. Here they are (as used by Nuke’s color picker)…
Color Temperature (T):
Red Gain = 1 – T/2, Blue Gain = 1 + T/2
Magenta/Green (M):
Red Gain = 1 + M/3, Green Gain = 1 – M*2/3, Blue Gain = 1 + M/3
Intensity (I):
RGB Gain = 1.0 + Intensity
Download the macro here or view the help page on vfxpedia.
Nuke’s Smooth Ramp Functions
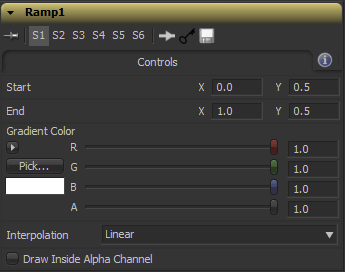
Nuke’s Ramp node can produce linear and smooth gradients. Here are its formulas. I have reverse-engineered them by trial and error after reading up on interpolation formulas like smoothstep (nicely summed up on this website).

In these formulas, “x” denotes a value from 0 to 1. The result falls into the [0-1] range as well and needs to be scaled by the desired end color if you want an RGB ramp.
// linear
y = x
// plinear: perceptually linear in rec709
y = pow(x, 3)
// smooth: traditional smoothstep
y = x*x*(3 - 2*x)
// smooth0: Catmull-Rom spline, smooth start, linear end
y = x*x*(2 - x)
// smooth1: Catmull-Rom spline, linear start, smooth end
y = x*(1 + x*(1 - x))
Here’s a ramp macro for Fusion which allows you to draw ramps directly onto an image like in Nuke. Fusion’s own BG tool is of course much more flexible, but it requires you to merge its gradient manually and it has no easy switch for smoothstep gradients.
Nuke Crashes on File Open
Just a quick note for everybody googling for this. If Nuke crashes, whenever you open the file dialog, open uistate.ini (found in your .nuke directory) and check if the “directory = ” entry contains a huge string (probably also of useless or invalid characters). Remove that entry and you’re done.
Portfolio Update “Wir Sind Die Nacht”
Hi there, head over to bildfehler.de for a few stills from a vampire movie I’ve worked on last year.
2D Track to 3D Nodal Pan
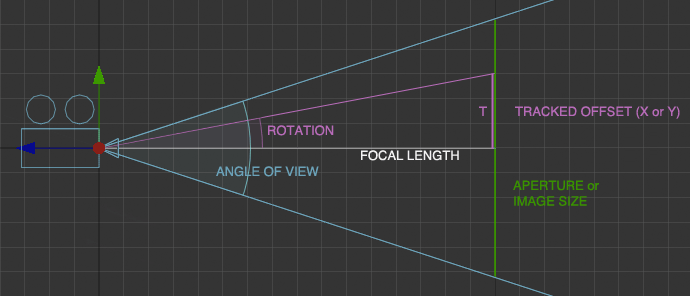
Here’s a pair of formulas that convert a 2D tracker’s position to rotation values for a 3D camera. Of course, this only works for nodal pans, and even in that case, it doesn’t handle Z rotation properly.
But if you have a camera that just pans or tilts, this allows you to – for example – add a 3D particle system or camera projection. The focal length can be chosen arbitrarily, as does the aperture (film back). The ratio of aperture values, however, has to match the image aspect!
In Fusion, the tracker provides an output for its stabilized position. Its zero position, however, is 0.5/0.5 which needs to be taken into account. Plus, the camera’s aperture is measured in inches while the focal length is measured in millimeters. Hence the conversion factor or 25.4. Of course, “Tracker1” needs to be replaced with whatever your tracker is called.
//X Rotation:
math.atan(25.4 * ApertureH * (Tracker1.SteadyPosition.Y-0.5) / FLength) * (180 / math.pi)

//Y Rotation:
-math.atan(25.4 * ApertureW * (Tracker1.SteadyPosition.X-0.5) / FLength) * (180 / math.pi)
Here’s an example comp for Fusion.
In Nuke, the tracker returns pixel values, so we need to normalize them to the image width. Also, the tracker needs to be switched to stabilization mode for the return values to be correct. Add these expressions to the camera’s rotation:
//X Rotation:
atan(vaperture * (Tracker1.translate.y / Tracker1.height) / focal) * (180 / pi)

//Y Rotation:
-atan(haperture * (Tracker1.translate.x / Tracker1.width) / focal) * (180 / pi)
edit: in my initial blog entry, vaperture and haperture were swapped. This has been fixed on 2011-05-15.
I won’t bore you with the derivation, but here’s a diagram in case you want to do it yourself 🙂
Contrast
I’ve always had a hate/hate relationship with the “contrast” slider – no matter which software. It would always clip the shadows, or worse, create negative values if used on floating point data (less of an issue in Photoshop but easily observable in Fusion). It looked ugly and I’ve spent a lot of redoing other people’s grading nodes because the color values were broken all over the place.
If you don’t know it already, here’s what the contrast slider usually does:
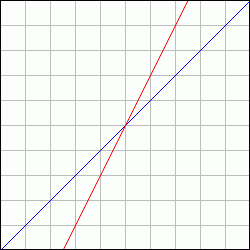
contrast as found in most image editing software
If you color-correct in sRGB (yuck) the slider really does change the picture’s contrast. But like I said, it clips shadow details pretty quickly. Which translates to “instantaneous” in linear (non-gamma-corrected) space where color values are tiny. The better way to increase contrast was an S-shaped curve tool (recently, Photoshop has finally improved its contrast algorithm and labeled the formula it used before as “legacy”).
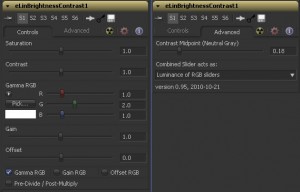
Nuke also has a contrast slider in its color correction node. First I avoided it like the plague until I tried it on a test gradient to figure out what it does. Lo and behold, it’s actually usable since its formula has been re-invented for linear floating point pipelines. It is actually a gamma correction but instead of “pivoting” around a value of 1.0 it is anchored on 0.18 – neutral gray in linear space:
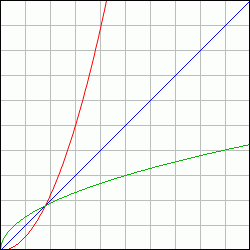
contrast as implemented in Nuke (on a scale from 0.0 to 1.0)
The formula is easy to implement: pow(color / 0.18, contrast_value) * 0.18
Of course it needs a failsafe when contrast_value is zero, but this is obviously a constant value of 0.18.
I have built this formula into a Fuse for Fusion along with Nuke’s other color correction sliders. This makes the tool useful to copy color corrections made in a Nuke script to Fusion. It could have been a macro, but the Fuse API allowed me to play around with the GUI and make Nuke users feel even more at home – myself included.
Download and more info at Vfxpedia.
Nuke: Read-Nodes auf Fehler checken
Praktisches Python-Snippet, das Read-Nodes, deren Footage fehlt, auf eine schwarze Slate umstellt:
for i in nuke.allNodes("Read"):
   if i.error():
      i.knob("on_error").setValue(1)
Möglich gemacht durch die Methode “error()”.
In Zukunft habe ich vor, ein paar weitere technische Artikel zum Thema Compositing zu bloggen. Mal sehen, ob der Vorsatz hält 🙂

