Normals, Matrices and Euler Angles
 Fusion can import point clouds from a 3D camera track, but there’s no easy way to align an image plane to three points in space. If you want to place walls or floors for camera projection setups, this makes for a tedious task of tweaking angles and offsets. So, I’ve been dusting off my math skills, especially transformation matrices, to write a script that allows you to place an ImagePlane3D or Shape3D with just a few clicks.
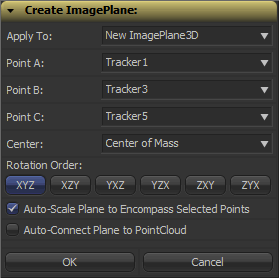
It’s a tool script that goes into your Scripts:Tool folder. You need to select a PointCloud3D before running it. Unfortunately, there’s no way for the script to know which points of the point cloud you have already selected 🙁 You need to hover your mouse over the point cloud vertices after you have launched the script to read their names and select the desired points from a list. The script will, however, remember your choices so you can play around with various trackers quickly and you can choose to apply the transformation to existing planes instead of creating new ones. Here’s a video of the process:
Here’s a script to freeze cameras for projection setups easily.
In case you’re curious: these are the steps that are necessary to solve this problem. Maybe it’s useful to somebody solving the same problem.
- A plane is defined by three points, which we have, but Fusion needs a center offset and three Euler angles move an object in 3D space.
- The center can be chosen almost arbitrarily: any point that lies on the plane is fine. For my script, the user is able to choose between one of the three vertices or their average (which is the triangle’s center of mass). The rotation angles can be deducted from the plane’s normal vector.
- To get the normal vector, build two vectors between the plane’s three vertices and calculate the cross product. This will result in a vector that is perpendicular to the two vectors and thus perpendicular to the whole plane.
- This vector alone won’t give you the required rotation angles just yet. You need a rotation matrix first. According to this very helpful answer on stackoverflow, a rotation matrix is created by three linearly independent vectors. These are basically the three perpendicular axis vectors of a coordinate system that has been rotated. One of them is the normal vector (which is used as the rotated Z axis). The second one could be one of the vectors we used to calculate the normal vector. However, there’s an algorithm that can produce a better second vector, one that is aligned to the world’s XYZ axes as closely as possible. This is useful since the plane we’re creating is a 3D object with limited extends instead of an infinitely large plane.
- The third vector we need can again be calculated using the cross product between the normal vector and the result of the previous step.
- To decompose a rotation matrix into Euler angles, there’s a confusing amount of solutions on the web since there are several conventions: row vectors vs. column vectors, which axis is up and most importantly, what’s the desired rotation order (for example XYZ or ZXY?). Fusion uses row vectors and supports all 6 possible rotation orders, so we’ll go with that. The source code can be found in Matrix4.h of Fusion’s SDK. Moreover, this paper (“Computing Euler angles from a rotation matrix”) explains the process quite well.
VFX Breakdown Effect (Breakdown)
I was pointed to an effects reel for “Wrath of the Titans” by Method Studios (you need to watch it on YouTube due to the usual licensing issues):
The shots look cool, but what was more interesting is the way they did the breakdown of their CG elements. Look at the camera moves at 0:14 or 1:17.
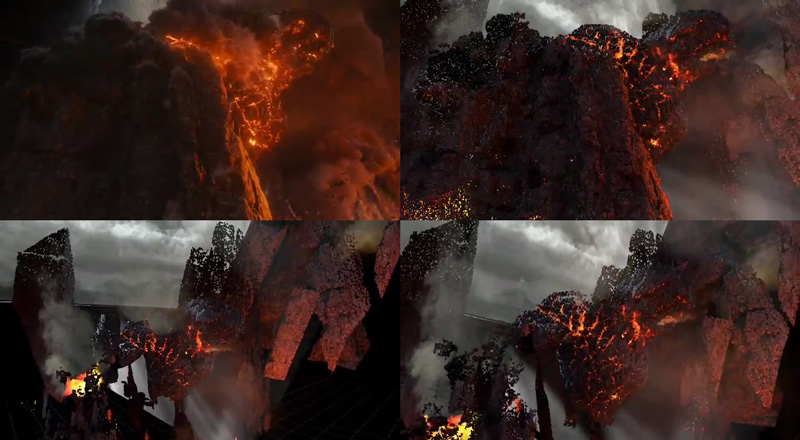
I’ve tried to dissect their technique using a Fusion comp and some random model I’ve downloaded from turbosquid (so don’t tell me it doesn’t look as cool as Kronos in the video above). The way I think this was done was by projecting the rendered passes back onto either real geometry or a recreation of the geometry using a world position pass. The latter is the only feasible solution for scenes with a high polygon count and can also be done as a particle cloud (see the “dissolving” rocks in the stills above).
Then, additional footage is brought in on image planes. Whether the footage was a 2D matte painting to begin with or a CG element doesn’t matter, for the breakdown it’s all treated like a 2D element. You can see this on the flat volumetric godrays.
To spice it up even more, they probably rendered additional passes especially for the breakdown (for example the wireframe pass) using the camera move designed for the breakdown shot. At this point you could also re-render your scene’s FX passes using the new camera move and treat the breakdown shot as if it was an original shot 🙂 Depends on how much work you wanna put into it.
Here’s a quick video that puts all the techniques together: particle cloud, projections, image planes and wireframe pass.
Mosaic Effect in Fusion
I’ve recorded another video tutorial for your viewing pleasure. It’s just a tiny effect, but the video shows that you can take even little tasks like this a bit further.
Rocket Launch Reference Footage
This is an awesome video about an impressive feat of engineering. But I don’t just love the video and it’s voiceover from a technology-geek point of view. It’s also a great reference footage for rocket exhaust and the mayhem it causes. I would love to see more science-fiction authors take this into account when they allow space ships to launch and land as effortlessly as a taxi pulling up.
Watch it full-screen and turn on HD 720p!
Here’s another one: The sound track of a ride on a space shuttle booster rocket from its launch to its impact in the ocean.
Thanks to my colleague who showed me the aptly-named tumblr page FUCK YEAH SPACE EXPLORATION 🙂
Verrückte Wissenschafter 2.0
YouTube hat dem Typus “Verrückter Wissenschafter” eine Frischzellenkur verpasst. Der Bastelfreak von heute wohnt nicht mehr bei Mutti im Keller, er ist extrovertiert und präsentiert sein Kind im Manne vor einem Millionenpublikum. Vom Hobby-Pyromanen bis zum Waffennarr – hier sind ein paar Youtube-Channels, die mich mehr faszinieren als ich gedacht hätte:
Nighthawkinlight
Pyrotechnik und Druckluftgeschosse, mit denen man sich ernsthaft verletzen könnte:
The Slingshot Channel
Jörg Sprave, der deutsche Steinschleuder-Enthusiast präsentiert sein Arsenal aus Holz, Stahl und Gummi:
FPSRussia
Ich bin mir immernoch nicht sicher, ob das nicht alles ein Fake ist und von einem Waffenhersteller gesponsort wird… aber was solls. Waffen und Explosionen, was will man mehr:
Doch halt, das Web gibt natürlich noch ganz anderen Wissenschaftlern eine Plattform. Die Macher hinter den folgenden Channels schaffen es, Wissenschaft für eine Generation spannend zu machen, deren Aufmerksamkeitsspanne die Länge einer SMS nicht mehr überschreitet. Ich finde, diese Videos erreichen mehr als ein Jahrzehnt “Mediengestalter” mit ihren Lern-CD-ROMs…
Minute Physics
Häppchenweise Quantentheorie in einer Minute und mit Filzstift:
TED Education
TED, die Konferenz mit den Vorträgen, die tiefgreifend und verständlich zugleich sind, hat sich mit Animatoren zusammengetan. Das Ergebnis sind Wissenschaftshäppchen, die die Neugierde von Schülern und Studenten wecken sollen. Hier ist ein Clip mit Adam Savage (Mythbusters):
NASA
Und zum Schluß etwas Entspannung mit den beeindruckenden Aufnahmen der NASA:
(Aufmerksam gemacht auf die letzten paar Videos hat mich Dropping The Science)
Space Stallions: Mind = Blown
Das ist was für die Fans von Sci-Fi-Zeichentrickserien aus den 80ern und 90ern: Thundercats + Galaxy Rangers + Saber Rider = Space Stallions!
Eine Bachelor-Arbeit vom dänischen Animation Workshop.
